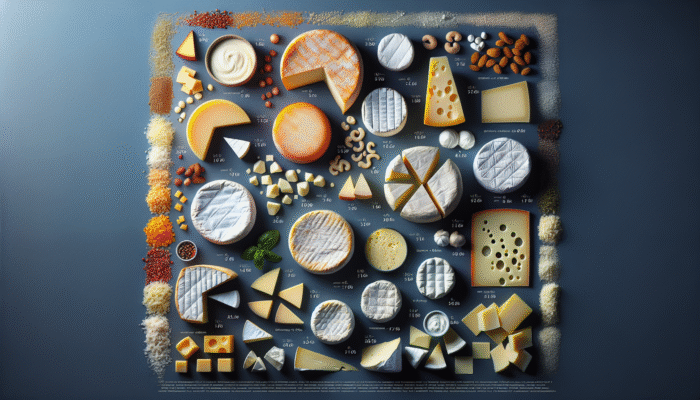
Choosing the Perfect Milk for Crafting Exquisite Homemade Cheese
Diving Deep into Milk Varieties for Cheese Production

Selecting the right type of milk is an essential step in your cheese-making process, as it fundamentally shapes the final product. Various types of milk, including whole milk, skim milk, and raw milk, each possess unique characteristics that can dramatically affect the flavor and texture of your cheese. Whole milk is often favored by beginners due to its rich and creamy feel, making it an ideal choice for those starting their cheese-making journey. On the other hand, skim milk tends to produce lighter cheeses, which may lack the depth and richness commonly associated with whole milk options. Alternatively, raw milk, when sourced from reputable farmers, provides an unparalleled flavor profile and complexity, although it requires a solid grasp of food safety practices to ensure proper handling and safety. Ultimately, your choice of milk goes beyond mere taste; it profoundly influences the overall essence and character of your cheese, impacting your culinary results.
As you consider your options, it’s crucial to evaluate the availability of local suppliers. If you have the opportunity to obtain fresh raw milk from a nearby dairy farm, it can significantly enhance your cheese-making experience, as the flavors derived from freshly sourced milk often surpass those found in mass-produced alternatives. Supporting local farmers not only enriches your cheese-making journey but also contributes to sustainability within your community. If fresh raw milk is unavailable, selecting organic whole milk from your local supermarket remains a reliable option that will still yield delicious and satisfying results.
Understanding the Crucial Role of Milk Pasteurisation in Cheese Creation
Grasping the importance of pasteurisation is vital for anyone embarking on the cheese-making adventure. This essential process involves heating milk to eliminate harmful bacteria, making it safer for consumption. However, while pasteurisation provides a protective barrier, it can also alter the flavour profile and texture of your cheese. Many cheesemakers advocate for the bold flavors achievable with raw milk cheeses, which may not be present in pasteurised varieties. The choice between raw and pasteurised milk ultimately depends on personal taste and food safety concerns, making it a critical aspect of your cheese-making process.
If you choose to explore the world of raw milk cheese, it’s essential to follow local regulations and procure your milk from trusted farms to minimize the health risks associated with unpasteurised products. Conversely, if you opt for pasteurised milk, you can still create a wide array of delicious cheese varieties in your kitchen. Embrace the medium you choose and adapt your techniques accordingly to achieve the best possible results.
Identifying Reliable Milk Sources for Successful Cheese Production
Finding high-quality milk starts with knowing where to look. Regular visits to local farmers’ markets, joining co-ops, and exploring health food stores can lead you to discover premium dairy offerings. When selecting your milk, it’s crucial to inquire about its origin: Is it organic? What feeding practices are implemented for the cows? The answers to these questions can greatly influence the flavour and overall quality of your cheese, laying the groundwork for a successful cheese-making experience.
Engaging with local food groups or participating in online communities dedicated to cheese-making can also provide invaluable recommendations for trustworthy suppliers. These platforms foster a sense of shared knowledge and experience that can transform your cheese-making journey into an enjoyable and rewarding endeavor. Remember, the milk you choose is not just an ingredient; it is a vital component that can elevate your homemade cheese to gourmet status.
Exploring the Impact of Milk Fat Content on Cheese Creation
The fat content of milk plays a crucial role in cheese production, significantly influencing the characteristics of the final product. Cheeses made from higher fat levels generally yield creamier and more indulgent results, while those made with lower-fat options may present lighter, less rich textures. If your goal is to create a sumptuous cheddar or luxurious brie, selecting whole or even higher-fat milk is essential. Conversely, if you’re interested in producing more delicate cheeses like mozzarella, experimenting with varying fat levels can lead to intriguing textures and flavor outcomes.
By understanding the science behind fat content and its influence on texture, you can intelligently tailor your recipes to suit your preferences. For instance, adding cream to skim milk can create a delightful balance, allowing you to enjoy the best of both worlds. Delving into this aspect of cheese-making opens up a wealth of possibilities, empowering you to produce cheeses customized to your taste preferences and culinary ambitions.
Key Guidelines for Proper Milk Storage and Handling in Cheese Production
The importance of proper milk storage and handling cannot be overstated in the cheese-making process. To maintain its quality, milk should be stored in the refrigerator and consumed before its expiration date. Always strive to use fresh milk for cheese-making; the fresher the milk, the more robust and flavorful your cheese will become. If you buy milk in bulk, consider freezing some to extend its shelf life; however, be aware that this may slightly alter its texture.
Before embarking on your cheese-making journey, ensure that all your equipment is thoroughly sterilized, and work in a clean environment. Any contamination can spoil your entire batch, resulting in disappointing outcomes. By prioritizing cleanliness and proper handling techniques, you position yourself on the path to cheese-making success, ensuring that each bite is as delicious as you envisioned.
Essential Tools and Ingredients for Creating Cheese at Home
Essential Cheese-Making Equipment for Budding Cheesemakers
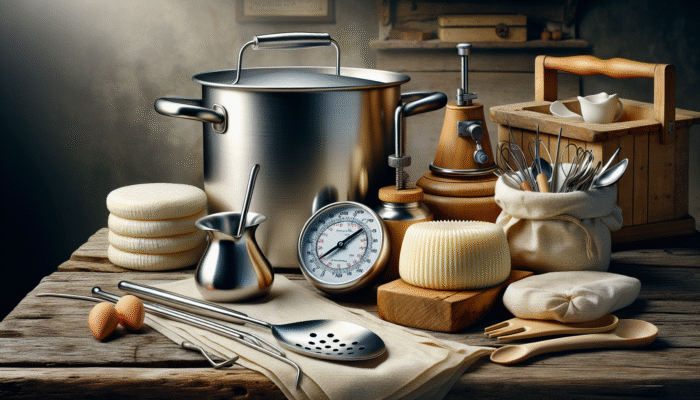
Embarking on your cheese-making journey requires equipping yourself with the right tools. Essential equipment includes a large stainless steel pot, a reliable thermometer for precision, fine cheesecloth, and a slotted spoon for stirring. A quality cheese mould will enhance the shape and presentation of your cheese, while a precise dairy thermometer ensures that your milk reaches the optimal temperature for curdling. Investing in high-quality tools streamlines your process and enhances the quality of your finished product.
For dedicated cheese-makers, consider adding a cheese press to your toolkit. This device allows you to apply consistent pressure during the draining process, resulting in firmer and more refined cheese. Moreover, utilizing a cheese mat for aging your creations can considerably elevate the final product. By thoughtfully selecting your tools, you are not merely preparing to make cheese; you are setting the stage for a delightful culinary adventure.
The Critical Role of Cultures and Rennet in Cheese Production
Cultures and rennet are indispensable components in the cheese-making process, responsible for curdling the milk and developing the desired flavor profile. Cultures consist of specific bacterial strains that ferment lactose into lactic acid, crucial for flavor development and the texture of cheese. Each cheese variety requires particular cultures, so understanding their roles will enhance your creativity throughout the cheese-making process.
Rennet is the enzyme that facilitates the coagulation of milk, leading to the formation of curds and whey. While traditional rennet is derived from animal sources, vegetarian alternatives are also available, catering to diverse dietary preferences. Experimenting with different cultures and rennets can yield exciting variations in your cheese, enabling you to explore new flavors and textures that delight the senses and elevate your culinary creations.
Innovative Ingredients to Create Unique Cheese Flavour Profiles
While milk, cultures, and rennet form the foundation of your cheese, don’t hesitate to unleash your creativity with additional ingredients that can elevate your culinary creation. Ingredients like herbs, spices, and infused oils can transform a simple cheese into a gourmet masterpiece. Consider incorporating garlic and basil for a fresh twist, or experimenting with smoked paprika for a robust flavor profile that excites the palate and enhances your cheese’s complexity.
For those with a sweet tooth, adding honey or fruit can yield delightful results. Imagine crafting a creamy goat cheese infused with figs or a tangy cheddar enhanced with jalapeños. The world of cheese-making is vast and varied; let your imagination run wild and see where your creativity leads you as you discover unique flavor combinations that tantalize the taste buds.
A Comprehensive Guide to the Cheese-Making Process at Home
Essential Steps for Preparing Milk for Cheese Production
Preparation is a crucial phase in cheese-making that can significantly affect the outcome. Begin by pouring your selected milk into a large, heavy-bottomed pot, ensuring it heats evenly. Gradually warm the milk over medium heat, using a thermometer to monitor the temperature accurately. Your target is to reach the specific temperature needed for the type of cheese you are crafting, which typically ranges between 85°F to 190°F (approximately 29°C to 88°C).
Once you’ve attained the desired temperature, gently stir the milk to ensure even heating throughout. At this point, it’s beneficial to add any additional ingredients, such as salt or herbs, before introducing your cultures. This moment marks the beginning of the transformation; the correct temperatures and cultures will lay the groundwork for curd formation, initiating the exciting cheese-making journey.
Effective Curdling and Cutting Techniques for Cheese Production
With your milk prepared, it’s time to curdle it. Introduce the rennet according to the package instructions, stirring gently for about 30 seconds before ceasing the stirring to allow the milk to sit undisturbed for 5-10 minutes. During this critical period, the curds will begin to form, and you’ll notice the separation of whey from the curds, indicating progress in the cheese-making process.
Once the desired curd formation is achieved, the next step is to cut the curds into manageable pieces. Using a long knife or a curd cutter, slice the curds into uniform sizes, as this uniformity is crucial for proper drainage. The size of the curds can significantly influence the texture of your finished cheese, so take care to cut them consistently. This cutting process also aids in releasing more whey, contributing to the overall firmness and quality of your cheese.
Draining and Pressing Curds for Optimal Cheese Texture
After cutting your curds, the next step is to drain them effectively. Transfer the curds into a cheesecloth-lined colander, allowing the whey to drain away. The duration of this step can vary, taking anywhere from 15 minutes to several hours, depending on the type of cheese you’re making. If you’re crafting a firmer cheese, consider applying gentle pressure to the curds while they drain to expel more whey efficiently and enhance the final texture.
For many types of cheese, pressing the curds is a vital concluding step. Move the curds into your cheese mould and apply weight to achieve a firmer texture. The pressing process can vary from a few hours to a full day, depending on the specific cheese variety you are pursuing. With patience and care, you’ll produce a quality cheese that showcases both rich flavor and satisfying texture, reflecting your efforts in the kitchen.
Exploring the Diverse Types of Cheese You Can Create at Home
Effortlessly Crafting Soft Cheeses for Beginners
Soft cheeses, such as ricotta and feta, are among the easiest varieties to create at home. Ricotta, known for its creamy texture and mild flavor, can be made with just milk, an acid (like lemon juice or vinegar), and a pinch of salt. Start by heating your milk, adding the acid, and allowing the curds to form. After draining, you’ll have a fresh, delightful cheese that’s perfect for spreads or versatile culinary applications.
In contrast, feta requires an additional step. After curdling and draining, the curds are crumbled and submerged in a brine solution. This method intensifies the flavor and extends the cheese’s shelf life, allowing you to savor its unique characteristics for longer. The versatility of soft cheeses is a beautiful aspect; enjoy them fresh or incorporate them into salads, pastas, or even sweet desserts for an exciting culinary twist.
Mastering Hard Cheeses for the Ambitious Cheese Maker
For those determined to master the art of hard cheeses like cheddar or parmesan, the process becomes increasingly intricate yet rewarding. Starting with high-quality milk, the initial steps closely resemble those of soft cheese-making but demand more advanced techniques, including a longer aging period. Cheddar, for instance, necessitates cutting the curds into smaller pieces and heating them thoroughly to develop its signature sharp flavor.
Aging serves as the defining factor for hard cheeses. After pressing the curds into blocks, they should be meticulously wrapped in cheese paper and stored in an environment with controlled temperature and humidity. The aging process can vary from a few months for mild cheddar to over a year for mature parmesan. Monitoring your cheese during this phase is crucial for developing the desired flavor profile and texture, making this stage a rewarding aspect of cheese-making.
Exploring Flavored Cheeses for Culinary Creativity
Elevate your cheese-making skills by delving into the realm of flavored cheeses. Adding herbs, spices, and even fruits can yield unique flavor combinations that tantalize the taste buds. Consider infusing your mozzarella with fresh basil and sun-dried tomatoes or blending soft goat cheese with honey and walnuts for a delectable spread that impresses guests and family alike.
Flavoring your cheese can involve various techniques, such as marinating or smoking. By immersing your cheese in olive oil with garlic and rosemary or cold-smoking your cheddar, you can impart intricate flavors that make your homemade cheese truly distinctive. The possibilities for crafting flavored cheeses are limited only by your imagination, so don’t hesitate to explore and experiment with new combinations that excite your culinary creativity.
Proven Techniques for Aging and Storing Cheese at Home
Refining Cheese Aging Techniques for Enhanced Flavor
The aging process is where the true artistry unfolds, transforming fresh curds into flavorful masterpieces. Different cheeses necessitate various aging techniques, influenced by factors such as moisture content and desired texture. Generally, hard cheeses benefit from longer aging periods, while soft cheeses are best enjoyed fresh or within a few weeks for optimal flavor.
Control is paramount during the aging stage. Maintaining consistent temperature and humidity levels is essential to foster proper maturation. Many cheesemakers utilize aging caves or dedicated cheese fridges to create the ideal environment for their creations. As your cheese ages, it will develop distinct flavors, aromas, and textures, marking this a dynamic and fulfilling journey for any cheese enthusiast.
Optimal Cheese Storage Conditions for Long-Lasting Quality
Proper storage is crucial for preserving the quality of your cheese. Hard cheeses should be wrapped in parchment paper or cheese paper, allowing them to breathe while preventing moisture accumulation. Conversely, soft cheeses require airtight containers to avoid drying out, particularly during storage. Always keep your cheese refrigerated, but allow it to come to room temperature before serving to enhance its flavor and texture, showcasing your hard work and dedication.
For extended storage, consider vacuum-sealing your cheese. This technique can significantly prolong its shelf life, keeping it fresh and flavorful for several months. However, it’s vital to regularly check stored cheese for signs of spoilage, such as unusual odors or mold, to ensure its quality remains intact and safe for consumption.
Monitoring Cheese Maturation for Optimal Results
Keeping a close eye on your cheese as it matures is essential for achieving the best results. Regular checks will enable you to assess the texture, aroma, and flavor development of your cheese. Look for indicators that suggest your cheese is aging properly, such as a firm rind or changes in color that signify the maturation process is on track.
As your cheese matures, tasting small samples can provide insight into its progress. This not only informs you about flavor development but also allows you to adjust future batches based on your personal preferences. The journey through maturation is not merely a waiting game; it’s an engaging experience with your cheese that ensures it reaches its peak potential, resulting in a product you can take pride in.
Identifying Common Aging Issues and Their Effective Solutions
Every cheesemaker may encounter challenges throughout the aging process. Common problems include excessive moisture, unwanted mold, or off-flavors that can detract from your final product. If you find that your cheese is too wet, consider increasing airflow in your aging environment or adjusting humidity levels to facilitate proper drying. For unwanted mold, trim it away carefully, but remain vigilant, as some molds can pose health risks if consumed.
Off-flavors can arise from various sources, including the quality of milk used or environmental factors. Maintaining cleanliness throughout the cheese-making process is essential to prevent contamination, which can lead to undesirable flavors. If you’re facing persistent issues, revisiting the quality of your milk or tweaking your aging conditions can help identify potential solutions. Embrace these challenges as opportunities to refine your craft, ultimately leading to superior cheese in the long run.
Effective Troubleshooting Techniques for Common Cheese-Making Challenges
Resolving Unwanted Textures in Your Cheese
Texture is a defining characteristic of cheese, and encountering undesirable textures can be discouraging. If your cheese turns out grainy or overly crumbly, it may result from excessive heat during curd formation or cutting the curds too small. To prevent these issues, be vigilant about monitoring temperatures throughout the process and ensuring uniform curd sizes during cutting.
If you find that your cheese is too dry after aging, consider adjusting your pressing technique. This may involve reducing the pressure applied during the pressing stage or closely monitoring moisture levels during aging. Experimenting with these variables can lead to significant improvements in the consistency and texture of your cheese, enhancing the overall quality of your homemade creations.
Addressing Off-Flavours in Your Homemade Cheese
Off-flavours can present a significant setback in cheese-making. If you detect sour or rancid flavors in your cheese, this may indicate bacterial contamination or the use of low-quality milk. Ensuring that your equipment is clean and that you’re using fresh, high-quality ingredients is crucial for preventing these undesirable tastes from occurring.
Should you experience persistent off-flavours, consider experimenting with different cultures or adjusting your fermentation times. Sometimes, subtle changes in your method can lead to remarkable improvements in flavor. Stay open to constructive feedback and be willing to adapt; this flexibility is an integral part of the learning journey in cheese-making and can lead to delightful discoveries.
Preventing Contamination for Safe Cheese-Making
Maintaining a contamination-free environment is essential for both the safety and quality of your cheese. Always commence with sterilized equipment and ensure that you’re working in a clean space. Regularly wash your hands and avoid cross-contamination by separating raw and cooked ingredients to safeguard your process and ensure the integrity of your cheese.
Additionally, monitor your cheese during the aging phase. If you observe unwanted mold or unusual odors, take immediate action to address these issues to prevent spoilage. Familiarizing yourself with common risks and implementing diligent practices will protect your cheese-making efforts, ensuring that every batch is not only delicious but safe for consumption.
Frequently Asked Questions About Home Cheese-Making
What is the Best Type of Milk for Cheese-Making?
Whole milk is frequently recommended for beginners due to its rich flavor and creamy texture. Moreover, raw milk can offer even greater complexity, but it’s essential to ensure it’s sourced safely from reputable suppliers to avoid health risks.
Can I Use Store-Bought Milk for Cheese-Making?
Absolutely! Store-bought whole milk serves as an excellent choice for making cheese, especially if raw milk isn’t an option. If possible, opt for organic varieties to achieve the best outcomes in flavor and quality.
How Long Does It Typically Take to Make Cheese at Home?
The timeframe varies based on the type of cheese being produced. Soft cheeses can be ready in just a few hours, while hard cheeses may require months to age properly and develop their full flavor potential.
What Should I Do If My Cheese Doesn’t Curdle?
If your cheese isn’t curdling, check the freshness of your rennet, verify that the temperatures are accurate, and assess the quality of your milk to troubleshoot the issue effectively.
How Should I Store My Homemade Cheese?
For hard cheeses, wrap them in parchment paper or cheese paper, while soft cheeses should be placed in airtight containers to prevent drying out during storage. Proper storage is key to maintaining quality and freshness.
Can I Make Cheese Without Specialized Equipment?
Yes! Basic cheese-making can be accomplished with common kitchen items like pots, thermometers, and colanders. However, investing in quality tools can significantly enhance your results and streamline the cheese-making process.
What is the Ideal Temperature for Aging Cheese?
Most cheeses age optimally between 50°F to 60°F (10°C to 15°C) with high humidity levels to prevent drying out during the maturation process, ensuring that your cheese develops the desired flavors and textures.
How Do I Determine When My Cheese is Ready to Eat?
Taste testing is the most effective method; evaluate the texture and flavor. Soft cheeses can be enjoyed fresh, while hard cheeses should develop deeper flavors over time, indicating they are ready for consumption.
Can I Flavor My Cheese During the Cheese-Making Process?
Yes! Incorporating herbs, spices, or even fruits can significantly enhance your cheese. Experimenting with these additions can lead you to discover unique flavor combinations that delight the senses and elevate your cheese-making experience.
What Common Problems Might Arise in Cheese-Making, and How Can I Resolve Them?
Typical challenges include unwanted textures or off-flavors. Closely monitor your techniques, maintain cleanliness throughout the process, and adjust pressing or aging conditions as necessary to achieve the best possible results with your cheese.
Connect with us on Facebook for more cheese-making tips!
The post Make Your Own Cheese at Home: A Simple Beginner’s Guide appeared first on https://cookinggods.com
The Article Make Cheese at Home: A Beginner’s Simple Guide Was Found On https://limitsofstrategy.com
The Article Cheese at Home: A Simple Guide for Beginners First Appeared ON
: https://ad4sc.com